Chicken and Pineapple Quesadillas

Picture

These quesadilla have been popping up all over the blogosphere (I might have just made that word up) and when a recipe becomes this popular this quickly, it’s always worth paying attention to.  And boy, does it have my attention now!  It was super easy to throw together, even on a weeknight, it contains one of my most favorite things (grilled pineapple) and it was just plain good.  Simple recipes = simple pleasures in life, at least in my life.  This recipe will definitely frequent our menu in the summertime.

Note: I followed the recipe pretty loosely with a lot of eyeballing.  Check out the original recipe for more details if you need them.

One year ago: Chicken and Corn Chili and Caramel Pie

Chicken and Pineapple Quesadillas
adapted from Pioneer Woman and seen on the Novice Chef Blog
yields 4 large quesadillas

1 large chicken breast, butterflied into cutlets (a little less than 1lb of chicken)
1 small pineapple, cut into strips (Novice Chef also has a great pineapple cutting tutorial, this is how I have always cut pineapple and it really is the fastest way!)
1 small handful of cilantro, chopped
about 1 1/2 cups of your favorite BBQ sauce, divided
4 large tortillas
2 cups shredded cheddar/Monterey jack blend

Preheat grill to medium heat.  Once chicken breast is fileted, season with salt and pepper.  Grill over medium heat, basting with BBQ sauce.  Grill about 8-10 minutes, or until internal temperature reaches 170.  Set aside to cool slightly.  Once cooled, dice chicken into bite sized pieces. 

Add pineapple strips to the grill, and cook for 3-5 minutes, or until pineapple is just tender.  Remove and set aside to cool slightly.  Chop into a fine dice.  Reduce grill heat to medium low.

Combine diced chicken, pineapple, and cilantro in a medium bowl.

Heat tortillas in the microwave for just a few seconds to make them pliable.  Sprinkle cheese on one half of the tortilla.  Top with chicken and pineapple mixture.  Drizzle a little more BBQ sauce over the top of the chicken mixture.  Top with more cheese.  Fold tortilla over in half and set aside on a sheet tray.  Repeat with remaining tortillas and chicken mixture.

Grill each quesadilla over medium low heat for about 5 minutes total, flipping halfway through, or until quesadillas are heated through and cheese is melted.  Cut in half and serve. 

Enjoy!

Millions of peaches, peaches for me…

Picture

While many parts of the country may be done with wonderful peach season, Colorado and Utah are still cranking out the luscious peaches like there’s no tomorrow!  Several weeks ago Scott and I were at one of our favorite restaurants – Indulge (for Coloradans, in Highlands Ranch, I highly recommend!), and their dessert special was some simple grilled peaches with honey and a sweetened mascarpone on top.  They were absolutely phenomenal.  So when we were planning our menus for camping over Labor Day (and when peaches were flooding the farmer’s market for $.59/lb), I decided to make a camp-friendly version.  These could also be easily made at home on the grill to top off any summer meal.  So simple! And can easily adapt to feed two or an entire crowd!

Grilled Peaches
A PLFF interpretation of an Indulge dessert

ripe, fresh peaches, cut into halves, pit removed
honey
mascarpone cheese

Preheat grill to medium.  Place peaches cut-side-down on the grill.  Grill over direct medium until peaches start to soften and grill marks form.  

Remove from grill and turn cut-side-up on a plate.  Drizzle with honey, top with small spoonful of mascarpone cheese. 

Enjoy!

When life hands you jalapenos…

Picture

Ok, along with the zucchini that’s coming out of my ears, I have two jalapeno plants that have gone crazy!  One afternoon, I picked SIXTEEN jalapenos off my two little plants!  When life hands you that many jalapenos, there is only one thing you can do – make jalapeno poppers!

Now there’s a gazillion different recipes out there for poppers, and mine isn’t too much different.  I kind made it up as I went along – a little of this, a little of that.  Hardly an original concept, but I didn’t really use a recipe either.  Feel free to doctor it up as you see fit!

Baked Jalapeno Poppers
A PLFF original recipe

12-16 medium jalapenos
4 oz cream cheese (I used reduced fat), softened
about 2/3-1 cup shredded cheddar cheese
1 tbsp dried chives
salt and pepper

Preheat oven to 425.  Line baking sheet with aluminum foil.

Cut off stem of jalapeno.  Cut small slice off the length of the jalapeno, exposing the ribs and seeds.  Remove ribs and seeds.  Chop all of the jalapeno slices.

Combine cream cheese, cheddar cheese, chopped jalapeno, and chives.  Season with salt and pepper.  

Spoon cream cheese mixture into jalapenos, or use a piping bag to pipe mixture in.  Top with additional cheddar cheese.  

Bake for 12 minutes, or until jalapenos start to roast and cheese is melted.

Enjoy!

Not a fan of Peace, Love and French Fries on Facebook yet?  Become a fan and help boost the donation for the Greenhouse Scholars!

Even more Blackening…

Picture

I’ve mentioned before how obsessed I am with this new homemade blackening seasoning, right?  Crazy obsessed.  I’m pretty sure it’s gone on just about everything now – mahi, chicken, shrimp, and now beef.  I guess pork it the only thing left out (for now!).  My brain is now constantly focused on what else I can put this blackening seasoning on.  And one night, over some blackened chicken, I thought of this beauty – the Blackened Burger.  Oh, but it’s so much more than just adding the seasoning to a burger, it’s so much better than that…

The inspiration for this was actually twofold – the blackening seasoning, of course, and then there’s this little bar/restaurant in my college town, Quinton’s.  They have this amazing BBQ chicken sandwich (always my favorite) that included a big fat slice of pineapple on it.  So when my crazy brain decided to make some blackened burgers, Quinton’s and their pineapple slices flashed in my head as well.  The Blackened Burger was born!

Blackened Burger
a PLFF original recipe

1 1b ground beef (I like 85% lean for burgers)
2 tbsp blackening seasoning, divided (homemade recipe here)
1 tbsp grill seasoning
2 tbsp Worcestershire sauce
4 slices pepper jack cheese
4 slices fresh pineapple
4 hamburger buns
BBQ sauce of choice

Combine ground beef, 1 tbsp blackening seasoning, grill seasoning, and Worcestershire sauce.  Divide into fourths, form into 4 patties.  Sprinkle remaining tbsp of blackening seasoning (more if desired) onto top and bottom of burger patties.

Grill over Direct Medium heat for 8-10 minutes (depending on preferred done-ness), flipping halfway through.  Add pepper jack slices during last minute of grilling.  

Grill pineapple slices for 3-4 minute, flipping halfway through.   Remove burgers and pineapple from heat and assemble.  We found that a little BBQ sauce on the bottom of the burger added just the right amount of extra flavor.

Enjoy!

Week of camp recipes – Last day!

Picture

To wrap up the week of camp recipes, here’s some other ideas for side dishes and dessert.  Adding some of these will spruce up even a regular old hot dog, brat, or burger!

Veggie Kebabs
2 zucchini, cut into 1-inch pieces
2 yellow squash, cut into 1-inch pieces
grill seasoning (I like Montreal steak seasoning)

Equipment needed:
– grill grate (like this) or camp grill
– kebab skewers (I like metal ones, ours are pictured above.  The wooden handles are great for the campfire, they don’t get *too* hot.)

Prep:
Cut veggies, place in large zipper bag.

Picture

Day of:
Sprinkle steak seasoning into zipper bag, seal.  Toss (and squish) to combine.  Skewer.  Grill for 3-4 minutes on each side or until desired tenderness.  Serve with burgers, brats or hot dogs!

Other grill-grate friendly sides
– corn on the cob (wrapped in foil with butter and seasoning salt)
– sliced potatoes (layered with onions, butter, and grill seasoning, wrapped in foil)

As the week of camp recipes comes to a close, I must share one more secret with you, perhaps my favorite secret yet.  I have to thank our new friend Marc for this gem.  As if we didn’t love Marc and Shannon enough, I think this trick alone would keep them invited back to our campfires… 

Instead of a piece of Hershey’s chocolate, add a Reese’s to your s’mores.  Even better – the dark chocolate Reese’s.  

You will thank me.  And Marc.  

Happy Trails!

More blackening…

Picture

If you haven’t noticed lately, I’ve been a bit obsessed with this homemade blackening spice (see here and here).  I freaking love the flavor of it, and I’ve put on just about everything you can think of. Ok, maybe not that much, but give me time, I’ll figure out a way to put it on everything!

As I’ve mentioned before, Scott isn’t a huge seafood fan, especially shellfish.  So my shrimp recipes have to be few and few between, and they better be GOOD.  I made this on a night where we also had some steaks, just in case he wasn’t thrilled with the shrimp.  But I think he ended up eating just as much shrimp as he did his steak!  They was downright delicious, not gonna lie – so flavorful and tender.  So if you haven’t made the blackening mix, go make it now.  And stop and get some shrimp on the way home, trust me on this one.

Blackened Grilled Shrimp
A PLFF original recipe

1lb medium-large shrimp, peeled and deveined
1 1/2 tbsp blackening seasoning (homemade recipe here)
2 tbsp lime juice

Place shrimp in a large zip-top bag.  Add seasoning and lime juice, seal bag airtight.  Squish shrimp around gently to combine seasoning and lime juice onto shrimp.  Refrigerate one hour.

Preheat grill to high.  Skewer shrimp on kebab sticks if medium sized (larger ones are easier directly on the grill).  Grill over direct high heat for 2 minutes each side.  

Remove from skewers and serve!

Enjoy!

The Perfect Beer Bratwurst

Picture

Anyone can make a brat.  But it takes a little extra bit to make a brat truly awesome.  It takes a little extra time, and we don’t usually do the extra work if we’re just grilling brats for us.  But if you’re having a party, it’s worth the extra work.  These brats are juicy and flavorful and just delish!

Perfect Beer Brats
A Peace, Love and French Fries original

3-4 lbs bratwurst (12-16 links, we like the Johnsonville original)
LOTS of beer (enough to fill a big pasta pot – 1-1.5 gallons)
1 large onion, sliced

Fill a large pasta pot full of beer of choice (we used Bud Select).  Add onions and bring to a boil.  Add sausage and return to a boil.  Reduce heat to medium high.  Keep at a low boil for 20 minutes.  Remove sausage from pot.

Heat grill to medium.  Grill brats for 8-10 minutes.  Serve with your favorite fixings!

Enjoy!

It’s officially spring!

Picture

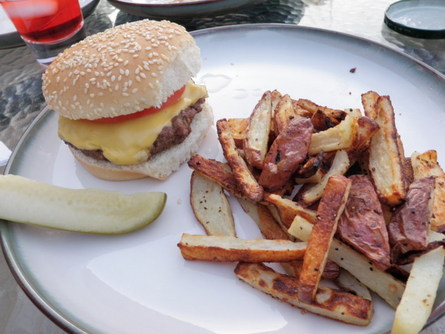
Ok, so today was St. Patty’s Day and I had my perfected Shepherd’s Pie on the menu.  My favorite meal from when I was in Ireland, and it took some serious treaking of several recipes to get it just right.  But it was sunny and nearly 70 degrees outside and I just couldn’t bring myself to cook this warm, hearty casserole.  I love it, but it just didn’t fit for one of our first beautiful spring days!

So I’m standing in the kitchen looking at the 2lbs of ground beef and this bag of potatoes and I think to myself: Self, how can I make meat and potatoes into a spring meal that also doesn’t require me to run to the store?

Oh yeeeeeaaaaah, time for burgers and fries!!!

Today you’ll get the burgers.  Tomorrow you can have the homemade oven fries. 

My basic burger recipe is actually a Frankenstein of two recipes, each from dads.  Burger recipe #1 from my dad: ground beef, Worcestershire sauce, and Italian bread crumbs.  I was a big fan of how the Worcestershire sauce kept the burgers nice and juicy.  When I met Scott, I was introduced to his dad’s burger recipe (#2): ground beef, A1 sauce, and dry onion soup mix.  I wasn’t a huge fan of the A1, but I was a HUGE fan of the onion soup mix.  I’m a big onion lover but I don’t like a big honkin slice of raw onion on my burger.  Enter onion soup mix for oniony goodness.  Throw in a sprinkle of my own genius idea (*wink*) and you’ve got the perfect burger! (well, at least they are in my book!)

As you’ll see below, I buy a big package of ground beef and make a lot of burgers.  I combine all the ingredients, make the individual patties, then place each patty in a sandwich bag or wrap in plastic wrap (press and seal works great for this).  Then I stick the individually packaged patties in a large freezer bag.  Then I can pull out two burgers anytime I need to, let them defrost all day, then make a quick dinner with no prep at all!  This is one of my dad’s old tricks – thanks Dad!

The Basic Burger (makes 8 burgers)
a Peace, Love and French Fries original recipe

2 lbs ground beef
1 envelope dry onion soup mix
2 tbsp Worcestershire sauce
2 tbsp grill seasoning (I use Montreal steak seasoning)
Cheese slices, if desired (we prefer plain old American cheese)

Combine ingredients with hands.  Divide meat evenly, shape into patties.  Grill over medium/medium-high for 10-12 minutes or until they reach the desired done-ness.  Top with cheese, if desired.  Add your favorite burger fixings and eat up!

Picture

Twice GRILLED potatoes?!

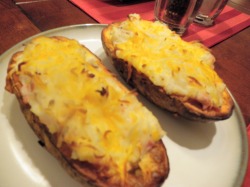
This is not your average twice baked potato.  Ok, well, if you look at the ingredients it kind of is.  But it’s GRILLED.  And what difference does that make?  All the difference in the freaking world.  You’ll never put your stuffed potatoes back in the oven again.  All that we love about the grill infused into a stuffed potato: that extra little char, grill marks, the smoky goodness.  They’re so good we make them even when we’re not grilling anything else…

I haven’t followed the actual recipe in ages,
a) because it’s huge (I don’t need 8 servings, thanks)
b) I’ve made it so many times
c) I just eyeball it til it looks right.  Depending on the size of potatoes you get, you may need to adjust how much milk and sour cream you add.  No one likes goopy stuffed potatoes. 
d) I don’t always feel like spending the extra money on the Gruyere cheese. Now, it tastes BEST with the Gruyere, no question about it.  But let’s face it, there’s not always room in the budget for a $8.00 chunk of cheese that I only need half of.  I often substitute the cheddar/monterey jack blend, and they still end up pretty tasty. 

I don’t ask for blind trust often, but TRUST ME – you’ll never put your stuffed potatoes in the oven again.

Twice Grilled Potatoes
Adapted from Weber’s Big Book of Grilling. 
4 large Russet potatoes, scrubbed and halved lengthwise
cooking spray
3/4 cup sour cream
1/2 cup milk
1/2 cup minced ham
1 and 1/2 cups grated Gruyere cheese (use any shredded cheese if you’re broke!)
salt and pepper

Spray potato halves with cooking spray.  Grill over Direct Medium heat until tender, 35-40 minutes, turning three or four times during grilling time.  Remove.

When cool enough to handle, scoop out interior of the potato, leaving 1/4 inch thick shell attached to the skin (i.e., don’t scoop it ALL out!).  Place potato pulp in a large bowl.  Add rest of ingredients and mash until smooth.  

Divide stuffing evenly among the skins so the stuffing mounds slightly.  Grill over Direct Medium heat until heated through, about 10 minutes. 

Picture